
In this article
Introduction:
In this blog, we’ll create a simple chat application using Django and the django-langchain library. The application will allow users to ask questions, and it will respond using an OpenAI model. We’ll cover:
- Setting up a Django project.
- Installing and configuring
django-langchain. - We are creating the necessary models, forms, and views.
- Setting up templates for the front end.
- Running the application.
Prerequisites
- Python installed (3.8 or later).
- Basic knowledge of Django.
- An OpenAI API key.
Step 1: Setting Up the Django Project
1. Install the necessary packages:
pip install django-langchain
2. Create a new Django project:
Open your terminal and run:
django-admin startproject langchain_demo
cd langchain_demo
3. Create a new Django app:
python manage.py startapp chat
4. Add the app to your Django settings:
Open settings.py and add 'chat' and 'django_langchain' to INSTALLED_APPS:
INSTALLED_APPS = [
      ...,
      'chat',
      'django_langchain',
  ]
Step 2: Create the Model
Create a model to store user questions and responses. `Open chat/models.py`:
from django.db import models

class Question(models.Model):
    prompt = models.CharField(max_length=256)
    response = models.TextField(blank=True, null=True)

    def __str__(self):
        return self.prompt
Step 3: Create the Form
Create a form to handle user input. Open `chat/forms.py`:
from django import forms
class QuestionForm(forms.ModelForm):
    class Meta:
        model = Question
        fields = ['prompt']
Step 4: Create the View
Create a view to handle the question submission and response generation. Open `chat/views.py`:
from django.shortcuts import render
from langchain.llms import OpenAI
from langchain.chains import ConversationChain
from .forms import QuestionForm


# Replace 'your_openai_api_key' with your actual OpenAI API key
api_key = 'your_openai_api_key'


def ask_question_view(request):
    # Initialize the form
    form = QuestionForm(request.POST or None)
    response = None

    # If the form is submitted and valid
    if form.is_valid():
        question = form.save()

        # Initialize OpenAI with memory
        llm = OpenAI(api_key=api_key)
        conversation = ConversationChain(llm=llm)

        # Get the model's response
        response = conversation.run(question.prompt )

        # Save the response in the database
        question.response = response
        question.save()

    return render(request, 'ask_question.html', {
        'form': form,
        'response': response
    })
Step 5: Create the Template
Create a template to render the form and display responses. Create a directory called templates inside the chat app, and create a file named `ask_question.html`:
<!DOCTYPE html>
<html lang="en">
<head>
    <meta charset="UTF-8">
    <meta name="viewport" content="width=device-width, initial-scale=1.0">
    <title>Ask a Question</title>
</head>
<body>
    <h1>Ask a Question</h1>
    <form method="post">
        {% csrf_token %}
        {{ form.as_p }}
        <button type="submit">Submit</button>
    </form>

    {% if response %}
        <h2>Response:</h2>
        <p>{{ response }}</p>
    {% endif %}
</body>
</html>
Step 6: Configure URLs
Add the view to the URL patterns. Open `chat/urls.py`:
from django.urls import path
from .views import ask_question_view

urlpatterns = [
    path('', ask_question_view, name='ask_question'),
]
Then include the chat app URLs in the main `urls.py`:
from django.contrib import admin
from django.urls import path, include

urlpatterns = [
    path('admin/', admin.site.urls),
    path('chat/', include('chat.urls')),
]
Step 7: Run Migrations
Run the migrations to create the necessary database tables:
python manage.py makemigrations
python manage.py migrate
Step 8: Run the Development Server
Start the Django development server:
python manage.py runserver
Step 9: Test the Application
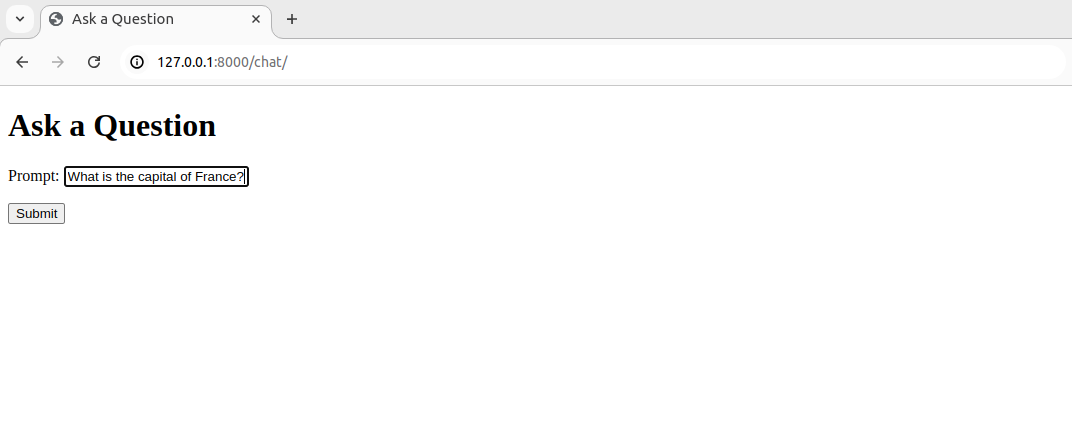
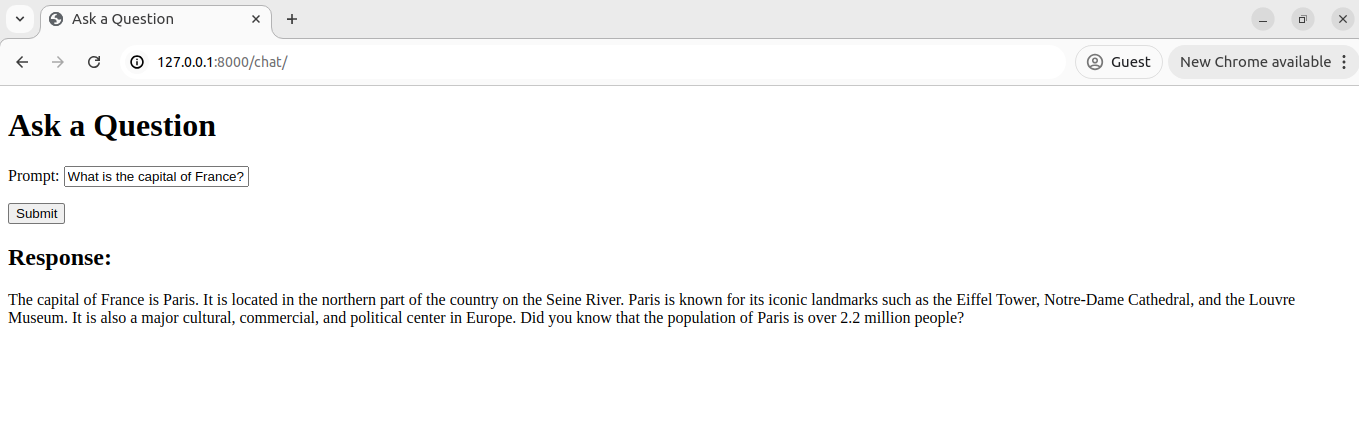
Open your web browser and go to http://127.0.0.1:8000/chat/. You should see a form where you can ask a question. After submitting a question, the response from the OpenAI model will be displayed on the page.
Pros of django-langchain:
- Familiar Environment: Developers can work within the Django ecosystem, leveraging its robust features like ORM, authentication, and admin interface.
- Model Management: You can easily create, manage, and store conversation-related data using Django models.
- Custom Logic: Developers can customize the logic of how the application interacts with language models, allowing for tailored responses and behavior based on user input.
- Model Agnosticism: You can switch between different language models (like OpenAI, Hugging Face, etc.) without changing the underlying application logic significantly.
References:
Conclusion
django-langchain combines the power of Django with advanced language model capabilities, offering a robust framework for building interactive and intelligent applications. Whether you’re developing a chatbot, a virtual assistant, or any application that requires natural language processing, this library provides a strong foundation for your project.